Saturday, March 31, 2012

Berk Korucu - 030080104 - 6th Week


1) Eddy Current Testing (NDT Method)

Previous Definition (Better)

Eddy-current testing uses electromagnetic induction to detect flaws in conductive materials. In a standart eddy current testing, a circular coil carrying current is placed proximity to the test specimen. The alternating current in the coil generates changing magnetic field which interact with the test specimen and generates eddy current. Variations in the phase and magnitude of these eddy currents can be monitored using a second "search" coil, or by measuring changes to the current flowing in the primary "excitation" coil. Variations in the electrical conductivity or magnetic permeability of the test object, or presence of any flaws, wiil cause a change in eddy current flow and a corresponding change in the phase and amplitude of the measured current.
Eddy-current testing can detect very small cracks in or near te surface of the material, the surfaces need minimal preparation, and physically copmlex geometries can be investigated. It is also useful for making electrical conductivity and coating thickness measurements.
(Effective Building Maintenance: Protection of Capital Assets, Herbert W. Stanford,Stanford III, Herbert W., p.74)


New Definition


The main applications of the eddy current technique are for the detection of surface or subsurface flaws, conductivity measurement and coating thickness measurement. The technique is sensitive to the material conductivity, permeability and dimensions of a product. 
Eddy currents can be produced in any electrically conducting material that is subjected to an alternating magnetic field (typically 10Hz to 10MHz).  The alternating magnetic field is normally generated by passing an alternating current through a coil.  The coil can have many shapes and can between 10 and 500 turns of wire. The magnitude of the eddy currents generated in the product is dependent on conductivity, permeability and the set up geometry.  Any change in the material or geometry can be detected by the excitation coil as a change in the coil impedance. The most simple coil comprises a ferrite rod with several turns of wire wound at one end and which is positioned close to the surface of the product to be tested.  When a  crack, for example, occurs in the product surface the eddy currents must travel farther around the crack and this is detected by the impedance change.
(M. Willcox, G. Downes, A Brief Description of NDT Techniques, p17)


2) Laser Doppler Vibrometer (Measurement)


Previous Definition


The Laser Doppler Vibrometer (LDV) is commonly used instrument to measure velocity in structures in a non-contact fashion. The LDV works by splitting a laser, inside the system, and sending one part of split beam to receptive surface (reference beam), with the other part of the split laser sent to the structure in question. This second laser, or measurement, beam reflects back to the LDV unit after hitting the point of interest. The velocity of structure changes the frequency of the measurement beam. The velocity is calculated by comparing the frequency of the reference and reflected beams.
(Development and verification of a computer vision technique to measure the response of civil structures, Glen R. Wieger,University of South Carolina. Civil Engineering, p.3)

New Definition (Better)

The Laser Doppler Vibrometer (LDV) operates by measuring the velocity of a point addressed by a focused laser beam, using the Doppler shift between the incident light and scattered light returning to the measuring instrument. This has the distinct advantages of avoiding loading the structure being tested and of allowing the point addressed to be easily altered, by interposing adjustable beam-directing mirrors. Advantage has been taken of the LDV to give a half-way house between the use of accelerometer arrays, which give FRFs at very limited numbers of points, and field measurements, which have a much higher spatial resolution. Response measurements can, with an LDV, be obtained successively at hundreds or thousands of designated points without any of the structural changes so often introduced by accelerometer loading, and without multi-channel instrumentation. One disadvantage of the LDV is that the unavoidable optical phenomenon of speckle noise means that, in a typical point-by-point LDV survey, the LDV signal is spoiled at a few points by "speckle drop-out" and some form of data smoothing may be necessary to give a true picture of the spatial mode shape.
(A.B. Stanbridge, D.J. Ewins, Modal Testing Using A Scanning Laser Doppler Vibrometer, p1)


3) Wollaston Process (Manufacturing)


Previous Definition


The modern field of powder metallurgy dates to the early nineteenth century, when there was a strong interest in the metal platinum. Around 1815, Englishman William Wollaston developed a technique for preparing platinum powders, compacting them under high pressure, and baking (sintering) them at red heat. The Wollaston process marks the beginning of powder metallurgy as it is practices today.
(Fundamentals of Modern Manufacturing: Materials, Processes, and Systems, Mikell P. Groover, p.346)


New Definition (Better)

Wollaston published a full account of the technical details of his process just before he died in 1828. The essential points are that the aqua regia used for dissolving the mineral should be dilute (about 50:so) to avoid dissolving the iridium. The yellow precipitate produced by salamoniac was to be well washed and then well pressed, before being gently heated at a low heat to produce platinum sponge. He emphasised that the heat must be only just enough to bring this about and, in any grinding required, the metal must on no account be burnished. He recognised the need to preserve in the sponge a certain virginity about its surfaces if the subsequent welding was to be successful. A century later his acumen in this respect provided a vital foundation for the science of powder metallurgy. Having got his sponge into a fine and uniform powder by hand-rubbing, he washed and elutriated it thoroughly with water. After pouring off the excess of this, he transferred the metal mud to a brass mould and then closed tlis with a steel stopper wrapped in blotting-paper and topped with some wool, which allowed the excess water to escape under hand-pressure, A plate of copper was then put on top and the whole introduced into a powerful horizontal press of his own design. This produced a hard cake of metal which was next exposed to the greatest heat that he could obtain and then forged by hand on an anvil. An ingot of about 20 oz of malleable platinum resulted and this could be hammered into sheet or drawn into wire. Such was the material which Wollaston and his fabricators used for their articles for sale. He himself used the full procedure throughout the rest of his working life.


(D. McDonald, The Production of Malleable Platinum, p.105)


4) Coolidge Process (Manufacturing)


Previous Definition


In 1908, William Coolidge developed a procedure that made production of tungsten incandescent lamp filaments feasible. In this process, fine powders of tungsten oxide were reduced to metallic powders, pressed into compacts, presintered, hot-forged into rounds, sintered and finally drawn into filament wire. The Coolidge process is still used today to make filaments for incandescent light bulbs.
(Fundamentals of Modern Manufacturing: Materials, Processes, and Systems, Mikell P. Groover, p.346)

New Definition (Better)

This process consisted in incorporating tungsten powder with a ductile metal alloy of cadmium, bismuth and mercury, Squirting the mixture through a suitable die and then, by heat treatment, removing the foreign ingredients and sintering the tungsten powder. This, so-called, amalgam process was subsequently used in preparing thick tungsten filaments from which the first tungsten wire was drawn. As the amalgam process gave better squirted filaments, in the large sizes, than were at the time obtainable in any other way, it was intensively developed by Dr. Coolidge in the laboratories and later became the standard factory process for the production of high wattage and series lamp filaments. 
Early in 1907, Dr. Coolidge again took up the hot working of tungsten, experimenting with a small rolling mill such as is used by jewelers. He heated the rolls, a most unusual operation, to a temperature of about 300 degrees Centigrade and passed amalgam process tungsten filaments between the hot rolls, obtaining an appreciable lengthening of the filaments. Before this time he had discovered that he could bend amalgam process filaments into special shapes by the application of proper but relatively low temperatures, going so far as to coil the filament into a spiral whose internal diameter was no greater than that of a knitting needle. This in itself was a valuable achievement, as such concentrated filaments are of value in focusing types of lamps such as those used in automobile headlights.
(W. Howell,H. Schroeder, History of The Incandescent Lamp, p.102)


5) Abrasive Flow Machining (Surface Cleaning)


Previous Definition


Abrasive flow machining (AFM) is an innovative finishing and polishing operation with a gentle material removal mechanism. In contrast to other machining methods for deburring and polishing, it is possible to machine difficult-to-access cavities, inner contours and undercuts in a reproductible manner. Typical components that could be machined by AFM are extrusion and compression molding dies as well as crimping and stamping tools. Use of AFM on these tools showed that within 2 minutes processing time an improvement of the surface roughness from Ra=2µm to Ra=0.2µm could be achieved.
(Aurich, J. C., Dornfeld, D., Burrs - Analysis, Control and Removal, p.73)

New Definition (Better)

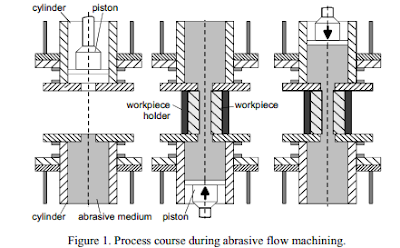
Abrasive flow machining (AFM) is a process for the production of excellent surface qualities of inner profiles that are difficult to access and outside edges, as well as for deburring and edge rounding. The grinding medium used in AFM consists of a polymer fluid, the so-called base, in which the abrasive grains are bound. The grinding medium is pressed along the contours at a defined pressure and temperature. Depending on the respective machining task, different specifications of media are used. The description of process-related metrial removal mechanisms requires  the knowledge of material removal mechanisms in AFM. Based on findings in flow mechanism, analyses have been made on material removal mechanisms.

(H. Szulczynsk, U. Eckart, Material Removal Mechanisms in Abrasive Flow Machining, p.1)
Mehmet Can ÇAPAR 6th week definitions

Rendering (design treatment)


(old answer) (better)
Real time renderingis concerned with making images rapidly on the computer. It is the most highly interactive area of computer graphics. An image appears on the screen, the viewers act or react and this feedback affects what is generated next. This cycle of reaction and rendering happens at a rapid enough rate that the viewer does not see individual images, but rather becomes immersed in a dynamic process.
 
(Real time rendering, Tomas Möller,Eric Haines,Naty Hoffman, pg.1)

(new answer)
Computer animation takes placein a virtual 3D world. However, it is normally visualized through a 2D screen 
made up of pixels. The rendering process is the computer animator's camera, which records the virtual world
in a format that can  be broadcast. Programmers have been developing renderers for many years and a range
 of techniques have been established. However, these approaches with their respective strengths and weakness
have traditionally been considered mutually exclusive-a rendering  system based on ray tracing  would  handle
shiny reflective surfaces efficiently, but users would simply have to accept that it could not handle displacement
or diffuse surfaces as well as some other architectures could.

(Ian Stephenson, Production rendering: design and implementation, pg:1)


Mehmet Can ÇAPAR 030070131, 6th week definitions (PART 3)

Digital-to-Analog Converters


(old answer) (better))
Analog-to-Digital and Digital-to-Analog Converters
Most sensors transmit data in analog form. At some point this must be converted to a digital format to allow the computer to read it. This is done by means of an analog-to-digital converter. Conversely, the driver circuits of actuators require analog input. Thus, the digital output of the computer must be converted to an analog signal by a digital-toanalog converter. Transmission of an analog signal requires only a wire pair, often in the form of a coaxial cable. With the recent advent of relatively inexpensive and compact analog-to-digital converters, considerable flexibility is possible in selecting the appropriate place in the system to perform the conversion. However, the limited number of output lines available on a microcomputer processor board usually requires that digital-to-analog conversion be done in the computer on circuit boards designed for the purpose. The outputs from the digital-to-analog converters are amplified and transmitted as analog signals to the actuator drivers.


(Standard Handbook of Machine Design, Robots and Smart Machines, Kenneth J. Waldron, Ph.D.,p47.25)


(new answer)

After the digital signal processor has altered the sound in some desired manner, the hearing aid must present the modified and amplified sound to the aid wearer. As there is no use presenting the aid wearer with a string of numbers, the modified numbers must be converted into an acouistical signal. This conversion is the job of the digital-to-analog converter (DAC) combined with the hearing aid receiver. Digital devices have traditionally done this by having a digital-to-analog converter that outputs an analog voltage, which in turn is fed to a receiver of some type to make the final conversion to sound. To minimize power consumption, digital hearing aids use a different solution. The multiple bits that comprise each sample are converted into a single bit that changes at a rate many times higher than the sample rate. The converter is referred to as a digital-to-digital converter. The high speed serial output from this converter is fed to the receiver, which averages out the high-speed variations in the digitalsignal to produce a smooth analog signal. The receiver thus forms part of the overall digital to analog converter. The electronic part of the digital-to-analog converter can be located either with all the other amplifier parts or inside the metal can that houses the receiver.


(Harvey Dillon, Hearing aids, pg: 36)


Mehmet Can ÇAPAR, 030070131 6th week definitions

Photoelasticity (experimental techniques)

(old answer)
The method of photoelasticity is based on the physical behavior of transparent, noncrystalline, optically isotropic materials that exhibit optically anisotropic characteristics, referred to as temporary double refraction, while they are stressed. To observe and analyze these fringe patterns a device called a polariscope is used. Two kinds of polariscope are common, the plane polariscope and the circular polariscope.
( Frank Kreith, CRC Press Mechanical Engineering Handbook 1999, ch.1 pg.99)


(new answer) (better)
Photoelasticity is one of the major experimental techniques for analyzing stress os strain distributions in loaded members. Photo depicts the use of optical methods, and elasticity implies interpretation of the experimental data utilizing the theory of elasticity. However, by using models of transparent polymers, or through the technique of photoelastic coating, the applications have been extended to inelastically deforming bodies.


(A.S. Kobayashi, ed, Manuel of Engineering Stress Analysis, 3rd ed., Prentice Hall, 1982)

Mehmet Can ÇAPAR, 030070131 6th week definitions


1-Chemical Engraving (Manufacturing method)
(old answer)
This is a closely related process in which chemical machining techniques are used to remove metal from selected areas of nameplates or other components to produce the lettering, figures, or other nomenclature required. Chemical engraving is a substitute for mechanical pantograph engraving. Lettering can be either deprressed or raised.
Typical parts produced by chemical engraving are instrument panels, nameplates, printing plates, signs, and pictures. Parts require engraving with fine detail are especially suitred to chemical engraving.


 (DFM Handbook, 2nd Edition, Bralla, p.4.227)


(new answer) (better)

    SACE (spark-assisted chemical engraving) makes use of electrochemical and physical phenomena to machine glass. The principle is explained in figüre 1.1. The workpiece is dipped in an appropriate electrolytic solution (typically sodium hydroxide or potassium hydroxide). A constant DC voltage is applied between the machining tool or tool-electrode and the counter-electrode. The tool-electrode is dipped a few millimetres in the electrolytic solution and the  counter-electrode is, in general, a large flat plate. The tool-electrode surface is always significantly smaller than the  counter-electrode surface (by about a factor of 100). The tool-electrode is generally polarised as a cathode, but the opposite polarisation is also possible.
     When the cell terminal voltage is low (lower than a critical value called critical voltage, typically between 20 and 30 V), traditional electrolysis occurs  (Fig.  1.2). Hydrogen gas bubbles are formed at the tool-electrode and oxygen bubbles at the counter-electrode depending on their polarisation and the
electrolyte used. When the terminal voltage is increased, the current density also increases and more and more bubbles are formed. A bubble layer develops around the electrodes.The density of the bubbles and their mean radius increase with increasing current density. When the terminal voltage is increased above the critical voltage, the bubbles coalesce into a gas film around  the tool-electrode. Light emission can be observed in the film when electrical discharges, the so-called electrochemical discharge,occur between the tool and the surrounding electrolyte. The mean temperature of the electrolytic solution increases in the vicinity of the tool-electrode to about 80-9o degrees C.Machining is possible if the tool-electrode is in the near vicinity of the glass sample (Fig.  1.3). Typically,the tool-electrode has to be closer than  25 micrometre from the workpiece for glass machining to take place
     However, thing are not simple as they seem. The gas film around the tool-electrode is not always stable. Microexplosions may occur destroying the machined structure locally. During drilling of holes, the local temperature can increase to such an extent, resulting in heat affected zones or even cracking.


 (Rolf Wüthrich, Micromachining using electrochemical discharge phenomenon, pg:2-3)


ŞAKİR ÇELİK,503111313,6th week words


1 Proximity sensor
2 Eddy current testing
3 Laser range finder
4 Photoelasticity
5 Accelerometer
6 Piezo velocity sensor
7 Laser doppler vibrometer
8 BNC connectors
9 LEMO connectors
10 Digital to analog converter

Evrim Berk 030060161 6th Week

1-) Retaining (Snap) Ring

Previous One

A retaining ring, also known as a snap ring, is a fastener that snaps into a circumferential groove on a shaft or tube to form a shoulder. The assembly can be used to locate or restrict the movement of parts mounted on the shaft. Remaining rings are available for both external (shaft) and internal (bore) applications. They are made from either sheet metal or wire stock, heat treated for hardness and stiffness. To assemble a retaining ring, a special plier’s tool is used to elastically deform the ring so that it fits over the shaft (or into the bore) and then is release into the groove. (Mikell P. Groover; Fundamentals of Modern Manufacturing Materials, Processes, and Systems 3rd Edition; pg.775)

New One

Shoulders is an economical way of positioning parts on a shaft. But it usually requires shafts of very large diameter and it is a costly procedure. With retaining rings designers can allow for a smaller shaft diameter and reduce machining to cutting a narrow circular groove. Retaining rings work only when a small amount of axial ply is permissable. They provide a removable shoulder to locate, retain or lock accurately components on shaft or in bore and housings.

materials used: Retaining rings are usually made of spring steel and remain seated there in a deformed position.

Application: They can be used to replace cotter pins and washer set screws and collar or nut and shouldered shafts. Thus they effectively lower the cost of fastening and assembly.

Disadvantages: They require grooves for seating, which are stress raisers. Hence snap rings should be avoided in areas of high stress.

(Babu, Sridhar; Design of Machine Elements; pg.233)

2-) RWD (Rear Wheel Drive)

Previous One

A front engine, rear wheel drive (RWD) vehicle has the engine in front and the drive axle in the rear. The transmission is usually right behind the engine, and a drive shaft transfers power back to the rear axle.

(Auto body repair technology, James E. Duffy,Robert Scharff, p. 25)


New One

The traditional layout has the engine situated with its output shaft set longitudinally. In this arrangement the rear wheels act as the driving wheels and the front wheels swivel to allow the vehicle to be steered. In the past rear-wheel drive was a natural choice becuase of the difficulty of transmissing a drive to wheel that had to swivel for steering purposes.

Spacing out the main components in this layout makes each unit accessible but a drawback is the intrusion of the transmission components into the passanger compartment. These create a large bulge in the region of the gearbox and a raised long bulge, called a tunnel, down the centre of the car floor for the accommodation of the propeller shaft. Using the rear wheels to propel the car utilizes the load transfer that takes place from the front to rear of the vehicle when the car is climbing a hill or accelerating.

(Hillier V.A.W. Fundamentals of Motor vehicle Technology,p. 7-8)


Hakan YORULMUŞ 030070111 week 6th

1)Trepanning (group : manufacturing method)
(previous)
Trepanning, also known as the circular cutting method, is used for producing larger holes. With this method, the dimension and precision of the drill hole diameter is determined by the relative motion between the workpiece and the laser beam. This technology roughly corresponds to laser cutting. An additional increase in precision by further decomposing the drilling process in ever more individual steps becomes possible by the so-called twist drilling, developed from trepanning drilling. Various scientific investigations have proven that a drill-hole quality that has never been achieved in ceramics and steel is possible with this method.
The centerpiece of the trepanning optical system consists of three specially designed beam splitters for aimed deflection of the laser beam. During the process, all three beam splitters rotate around the fiber optical axis. This allows one to adjust a desired phase shift proportional to the radius of the helix on the material. Integrating the trepanning optical system into the polarization adjustment will further improve quality. Drag lines will be avoided, the outlet cross-sectional area will be circular, and process efficiency will increase due to higher absorption.
(Springer Handbook of Mechanical Engineering, Springer Handbook of Mechanical Engineering,p672)

(new)- better
Trepanning is a hole-making operation where an annu­lar groove is produced leaving a solid cylindrical core in the centre (Fig. 6.43).In trepanning a cutter consist­ing of one or more cutting edges placed along the circumference of a circle is used to produce the annular groove. Deep trepanning, like gun drilling, is also a means to produce accurate long holes. Deep-hole trepanning requires a pressurized cutting fluid system and employs self-piloted cutting action.
Trepanning is feasible if the holes have a diameter more than 50 mm. Hole depths 160 times the dia­meter can be obtained in trepanning. The hole size and accuracy depend principally on the alignment accuracyof the set-up. the tool and the respective machining conditions. Normally, a diametral tolerance of 0.2 mm over a length of 500 mm can be achieved.

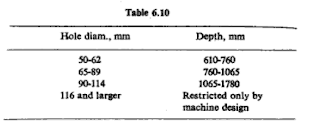
External Chip Removal Type In this type, the coolant is passed to the cutting edge through the boring bar. The chips are flushed out by the coolant through a flute located on the outer surface. The main advantage of this design is the ease of set-up and the minimum require­ment of auxiliary equipment. The limiting factor with regard to hole depth is that the diameter of the boring bar that is supporting the head must be small enough to assure easy passage of chips. The boring bar is usual­ly 25 mm smaller than the cutting diameter. In the case of smaller sizes, 75 mm or below, this will imply a weak boring bar not capable of withstanding torque if allow­ed to become too long. In spite of this limitation, this design is popular because of its adaptability to short holes. An external chip removal type trepanning cutter with a single cutting head is shown in Fig. 6.45a. Maxi­mum recommended depths for external chip removal are given in Table 6.10.

(Hmt,Hmt, H M T Bangalore, Production Technology,1980,page 179-180)

2) BNC Connector  (group : connector )
(previous)
Another type of coaxial connector that could be used in a residental system on RG58 and RG6 cable in data networking and some audio/visual applications is the Bayonet Neill Concellman (BNC) connector. The male portion (plug) of a BNC connector has a bayonet like shell with two small pins that fit into spiral slots located on the female portion (receptacle) of the connector. The plug is inserted into the receptacle and twisted into a locked position.
There are two styles of BNC connectors: a BNC-T connector and a BNC barrel connector. (All in One, 2nd Edition, Gilster&Heneveld, p.34)

(new)- better

The most common coaxial cable connector in use today and for some time to come is the BNC. The BNC connector (which stands for many different names, but most often the Bayonet Neill Concelman or British Naval Con­nector) is small, facilitates a quick connect/disconnect action, and works by being screwed onto a device such as a NIC. BNC connectors were quite popular in the early 1990s, but have since been increasingly replaced by RJ-45 connectors used with twisted-pair cabling. BNC connectors on coaxial cable were common on Thinnct (or 10Basc2) networks, but now arc more often used on T-3 data network lines. The connector itself is simple to
understand; it has two lugs on the female side of the connector that mate with the male side. When the connectors are twisted, they are then locked into place. This connector can be used with RG-58 to RG-179, RG-316, and many others. BNCs run at 50 ohms. An example of a BNC termination connector is shown in Figure 8.13.
In Chapter 7,"Fiber-Optic Media," you learned the fundamentals of optical fiber and its practical uses, and were introduced to fiber-optic connectors. The next section focuses on what you need to know about the termination of fiber-optic cabling, and contains additional details about the connectors used to terminate optical fiber. We cover the most commonly used connec­tor types (SC and ST), when to use each one, and why.
(Robert Shimonski,Richard T. Steiner,Sean M. Sheedy, Network Cabling Illuminated,2006,page 223-224)

3)Thermal Deburring  (group : manufacturıng process )

Thermal energy deburring consists of placing the part in a chamber which is then injected with a mixture of a natural gas an oxygen. When this mixture ignited, a heat wave is produced with a temperature of 33000C (6000F). The burrs heat up instantly and are melted away, while temperature of the part reaches only about 1500C (300F). 

This process is effective in very various applications on non-combustible parts. There drawbacks, however: larger burrs or flashes tend to form beads after melting; the process can distort thin and slender parts; and it does not polish or buff the work piece surfaces as do several other deburring processes.
 (Kalpakjian, Smith; Manufacturing Engineering and Technology 4th Edition; pg. 736,737)

(new)- better

INTRODUCTION

Over the years, industry has made great strides using mod­ern machining methods which have increased productivity and improved the quality ol manufactured parts. However, most of the attention has focused on primary machining methods, while finishing and deburring parts has been largely ignored. Today, 10% (and sometimes much more) of total manufacturing costs are spent on manual deburring.

All designers should consider deburring because it is so often a problem. Some machine shops insist that their parts are burr free. Burrs may be tolerable, but they are generally not desirable. Very often, groups of operators are put to work hand deburring parts for aesthetic reasons or because the parts will not function properly with burrs present

When the engineer determines that deburring must be done, there really are alternatives. First of all, he can consider various machining methods which might preclude the necessity of de­burring. Then he can choose between four machine methods of deburring. which shall all be reviewed in this book.

Around 1975, a commercial process was developed to offer industry an alternative to costly hand deburring—the process became known as the Thermal Energy Method of deburring (TEM). It is the fastest method in existence. Not counting load­ing and unloading time, the actual deburring time is less than 30 milliseconds.

THE PROCESS
The manufactured parts, with burrs, are placed in a thick-walled chamber which is sealed and pressurized with a mixture of oxygen and natural gas. (The ratio of oxygen to gas is 2*6:1.)
The chamber is closed and sealed with a toggle mechanism exerting a force of 250 tons. The gas mixture fills each nook and cranny of all parts in the chamber (even blind and intersec­ting holes): and the combustible mixture is ignited by a 30,000 volt spark which creates a 6000° F heat wave. (See Fig. 19.1.) in a few milliseconds, the fuel is burned out But since most burrs exhibit a high surface area-to-mass relationship, the burr cannot transfer heat to the main part fast enough to prevent its bursting into flames. Thus, the burr becomes a source of fuel and will continue to vaporize until the heat is transferred to the part itself. As the heat moves into the part the flame tempera­ture drops until it extinguishes itself. By this time, all burrs, chips, and contaminants have been vaporized.
In the process of vaporizing, the burrs become oxides of the metal being processed: aluminum oxide from aluminum parts and iron oxide from steel parts. The oxide settles on the partsas a loose powdery residue. Although the surface will appear discolored, it has not been oxidized and the discoloration will wash off with a suitable cleaner. A cleaning step can be avoided if the deburred parts are to be heat treated, bright dipped, black oxided. anodized. or otherwise treated or plated.
If postcleaning should be necessary to make the parts more presentable, cleaning equipment is available from the same company which manufactures the TEM machine. As a matter of fact, whenever you discuss deburring with a machine builder, you should also discuss cleaning if it is going to be required. The complete finished part is your goal, and if cleaning is signif­icant, it should be part of the manufacturing strategy. This is especially true when the cost of cleaning equipment equals the cost of the deburring machine.
The list of industries which are taking advantage of TEM is growing annually. The most recent technical advance was the ability to process plastics as well as metals. TEM is really another manufacturing tool to be used when the situation war­rants. The design engineer should consider the deburring prob­lem before completing his design. Recently, the author watched a crew of six operators hand deburring rocket tails. The job took an average of thirty minutes per part and it left unwanted scratches on the surface. Fifty percent of the cost of that part was deburring.

(James A. Brown, Modern manufacturing processes,1991, page 149-151)

4)Adhesive  (group : binding material)
(previous)
Adhesives are polymers used to join other polymers, metals, ceramics, composites, or combination of these material. The adhesives are used for a variety of applications. The most critical of these are the " strıctural adhesives", which find use in the automative, aerospace, appliance, electronics, construction, and sporting equipment areas.
Chemically Reactive Adhesives These adhesives include polyurethane, epoxy, silicone, phenolics, anaerobics, and polymidies. One-component systems consist of a single plymer resin cured by exposure to moisture, heat, or- in the case of anerobics- the absence of oxygen. Two-component systems (such as epoxies) cure when two resins are combined).
Evaporation or Diffusion Adhesives The adhesive is dissolved şn either an organic solvent or water and is applied to the surfaces to be joined. When the carrier evaporates, the remaining polymer provides the bond. Water-base adhesives are preferred from the standpoint of environmental and safety considerations. The polymer may be completely dissolved in water ır may consist of a latex, or a stable dispersion of polymer in water. A number of elastomersi vinyls an acrlics are used.
Hot-Met Adhesives These thermoplastic polymers and thermoplastic elastomers melt when heated. On cooling, the polymer solidifies and joins the materials. Typical melting temperatures of commercial hot-melts are about 80°C to 110°C, which limits the elevated-temperature use of these adhesives. High-performance hot-melts, such as polyamides and polyesters, can be used up to 200°C
Pressure-Sensitive Adhesives These adhesives are primarily elastomers or elastomer copolymers produced as films or coatings. PRessure is required to cause the polymer to stick to the substrate. They are used to produce electrical and packaging tapes, labels, floor tiles and wall coverings, and wood-grained textured films.
Conductive Adhesives Apolymer adhesive may contain a filler material such as silver, copper, or aluminum flakes or powders to provide electrical and thermal conductivity. In some cased, thermal conductivity is desired but electrical conductivity is not wanted; alumina, beryllia, boron nitride, and silica may be used as fillers to provide this combination of properties.
(Askeland,D.R,The Science and Engineering of Materials,3rd Edition, pg.514-515)

(new) - better
Adhesrves are defined as nonmetallic substances capable of joining materials by surface bonding (adhesion), the bond itself possessing adequate internal strength (cohesion). Adhesive is a generic term and covers other common terms, such as glue, paste, gums, adhesive cement, and bonding agent.
Composition. An adhesive is composed of basic raw malcriáis, which are called binders 11] and which determine ils adhesiveness (adhesion) and its internal strength (cohesion), and of frequently necessary auxiliaries, which establish particular end-use and processing characteristics. The adhesiveness of an adhesive, its internal strength after setting, and its processing characteristics are the fundamental properties that determine its suitability for use in forming adhesive joints. Adhesive joints are the joints formed between substrates and adherents using adhesives.
The binders used for adhesives are primarily high polymers having optimal strength properties. High interna! strength (cohesion) is essential if the adhesive in an adhesive joint is to be able to transmit forces from one adherent to the other. Most adhesives contain high molecular mass organic substances as their basic raw materials or reactive organic compounds that are preliminar)' stages of polymers and that read during the bonding process to form polymers. Inorganic polymers, such as the various types of waterglass, are used only to a very limited extent.
Virtually any standard polycondensatc, homopolymer, and copolymer and also polyadducts may be used, provided they can be applied as solutions, dispersions, emulsions, or melts. In addition to these raw materials, auxiliaries such as resins, plasticizers, fillers, thickeners, solvents, antiagers, preservatives, hardeners, or selling retarders, arc required, depending on the end use. Their function is inter alia to adjust tack, to improve adhesion, lo make flexible, to regulate viscosity, to stabilize, and to influence setting or hardening. 
(Gerhard Gierenz, Adhesives and Adhesive Tapes, 2001, page 1-2)

5)BMEP  (group : parameter)
(previous)

The most common mean effective pressure is the Brake Mean Effective Pressure or bmep, The adjective brake refers to measurement of the flywheel. Originally power output was measured by applying an ordinary brake to the flywheel, the brake being attached to a long arm, and the moment produced was measured. The power produced by the engine is proportional to the product of the moment produced and the angular rotational speed. This break was a primative dynamometer, and was developed by F. M. Riche, Baron de Prony. And it was known as a Prony brake.

(John Leask Lumley, Engines an Introduction,first edition, page 16)

(new)- better

The four modes (strokes) of the internal eombustion engine are more clearly defined in a pressure-volume, or P-V diagram. Figure 1.26 illustrates the four strokes in detail for a cold motoring engine (dotted traces) and a firing engine (solid traces). The P V diagram is taken at the standard mapping point of 1500 rpm, 2.62 bar BMEP and A,'F ratio of 14.6:1 (i.e. world-wide mapping point). These terms will he defined shortly.
Mean effective pressure. MF.P, is the value of constant pressure that would need lo be applied to the piston during the expansion stroke that would result in the same work output of the engine cycle. Equation (1.36) illustrates the definition of MEP:
Torque and volume arc in Nm and liters, respectively.
To understand brake mean effective pressure, BMEP, as used in Figure 1.23 it is necessary to first understand indicated mean effective pressure, IMF,P, mechanical efficiency, >jM, indicated specific fuel consumption, ISFC, indicated specific air con­sumption, ISAC and volumetric efficiency, r;,.. 'Indicated' refers to the net process such as work or power performed by the working mixture in the cylinder acting on the piston over the compression and expansion strokes. 'Brake' means the torque or power at the engine crankshaft measured at the flywheel by a dynamometer [13|. 'Friction' refers to the work required to overcome engine mechanical friction and pumping losses (work is necessary to induct the air fuel mixture into the cylinder and to expel the excess spent charge). These terms are defined us follows:
Equation (1.38) defines the mechanical efficiency of the engine in terms of its brake and friction MEPs. Fuel consumption, BSFC, is then defined as the indicated specific fuel consumption, ISFC, defined later, diverted by engine mechanical effi­ciency. Engine volumetric efficiency is a measure of how close the engine is to a positive displacement air pump. Volumetric efficiency is defined as the ratio of actual air flow through the engine to its ideal air flow, where 'ideal' is defined as (he dis­placement volume filled with a fresh charge at standard temperature and pressure. Volumetric efficiency is dependent on valve number and size (4 V is more efficient than 2 V. for example), the valve lift and profile, manifold dynamics, tuning and losses, and the heat transfer during the induction process (minimal):
Making the appropriate unit conversions leads to the definition of* volumetric efficiency as stated in (1.41):
where the air charge is corrected for temperature and pressure deviations from STP. Engine speed is given in rpm and cylinder displacement in liters.

(John M. Miller, Propulsion Systems for Hybrid Vehicles,page 38-40)